Saturday 17 December 2011

How To Save Youtube videos (and other streaming videos) In Windows 7 and Vista


If you have Windows 7 or Windows Vista, you can save videos from Youtube and other similar website by copying Internet Explorer temporary file.
There is no benefit compared to other method of downloading streaming media other than you can impress your novice computer user friends when you do this on their computer LOL.
Okay, this is how to do it step by step:
- Firstly, make sure you can view hidden and system files:Click Start/Orb -> Computer
Click Organize -> Folder and search option
A new window should be appear. Choose ViewClick on Show hidden files, folder, and drivesRemove the tick on Hide protected operating system files tickbox.
For novice user: With this setting,  you will be able to remove system files, so make sure not to remove any files!
For expert user: You wouldn’t be here reading this blog hehe :p  
Now you are ready to download the video.
- Open the videos that you want to save in Internet Explorer.
- Wait until the video is fully buffered (ie. in youtube the seeker bar is fully red)
- Click Start/Orb  -> Computer
- Type / paste this text to your address bar:
C:\Users\XXXXXX\AppData\Local\Microsoft\Windows\Temporary Internet Files\Low\Content.IE5
but replace the XXXXXX with your Personal Folder name. (See notes below if you dont know the name)
After you finished typing/pasting the address, press enter
You should see folders named with random alphanumeric character. Your video is inside one of those folders.
(to avoid doing this in future, I suggest you put a shortcut to this folder in your Windows desktop)
Open those folders one by one (if security dialog box appear just click Yes), and sort the files by Size and Descending so you can easily recognize your downloaded video. If said video is from youtube, file name should be something like “videoplayback[x]” ( the x in brace will be a number).
If you can’t see said file, go back (press backspace or back button) and open another folder.
Once you found the file, rename it (press F2) and add .flv at the end of the file name so the file name would be something like videoplayback[1].flv
you can rename it to anything as long as the extension is .flv
Open that file, and it should be played with your media player.
Move the file to other folder. If you don’t move it, it might be removed by Internet Explorer after certain time.
Note : if you dont know your pesonal folder name, click Start/Orb -> Computer , open your root drive (usually C:\) and open folder”Users”. Your Personal Folder is the one that is not “All User”, “Default”, “Default User”, “Public”.
Thanks for reading, feel free to ask if anything is not clear for you.

Friday 9 December 2011

Registry Edit to Disable Writing to USB Drives

Registry Edit to Disable Writing to USB Drives

A common security concern at organizations is allowing users to plug in a usb flash drive, because they could so easily copy corporate data.
Since Windows XP SP2, you can disable writing to USB devices altogether using a simple registry hack. Here it is:
[HKEY_LOCAL_MACHINE\SYSTEM\CurrentControlSet\Control\StorageDevicePolicies]
“WriteProtect”=dword:00000001
You can also just download one of the following registry tweaks to enable or disable writing to USB drives.
Enable USB Write
Disable USB Write
Once you use the registry hack, you will have to reboot for the changes to take effect. One should also note that if you are using this trick, you should make sure that the users are not administrators on the computer, because they could easily change this setting back.
This works on Windows Vista as well. Here’s the window you’ll get when you try and write to a USB drive:

Tuesday 6 December 2011

How To Set Up A Picture Password Or PIN In Windows 8

Microsoft Windows 8 has introduced many revolutionary concepts and new features. For instance, it has introduced two new ways of logging in - by using Picture Password or by using PIN.
A Picture Password enables you to use a picture from your library as a password. You have to perform three gestures on the picture that you want to use as your password. For example, you can select, draw and resize some portion of the picture as you want.

Set up a Picture Password in Windows 8 as follows:

1. Open Control Panel by clicking on the Control Panel option in the default Metro style home screen.
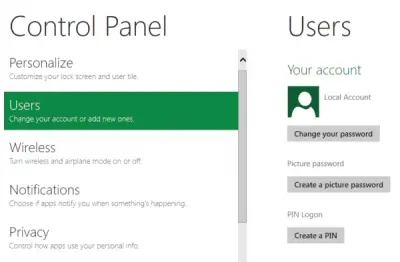
2. In the Control Panel window, select Users and then click on the Create a Picture Password option.picture password 01 400x262 How To Set Up A Picture Password Or PIN In Windows 8
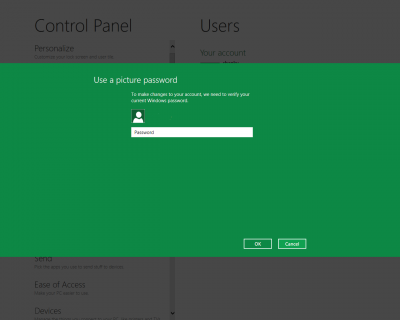
3. Then you will be asked to enter your Login Password, before you can set a picture password. Make sure that your Windows 8 account has a password. If you haven’t got one, you cannot create a picture password.picture password 02 400x320 How To Set Up A Picture Password Or PIN In Windows 8
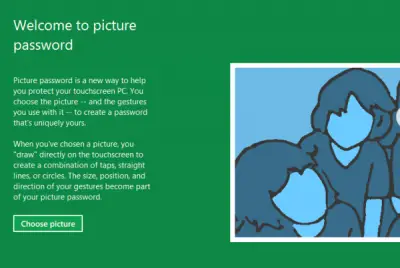
4. After that, browse to the picture that you want to use as your password and select it.picture password 03 400x268 How To Set Up A Picture Password Or PIN In Windows 8
5. You will be asked to perform 3 gestures which can be either selecting, resizing, creating straight lines or circles. You will need to redraw the pattern for confirmation.
Bingo! You have successfully setup a Picture Password. You will be asked to redraw the pattern at your next login. If you think that Picture Password is too complicated for you but you still want to experience a change in the method of login, Microsoft Windows 8 has a solution for you in the form of PIN.
Though this method is faster than traditional login and Picture Password, it is less secure than Picture Password, as it can have at most four digits as a password. Still it is worth a try if you are using a touch based device.

Set up a PIN in Windows 8 as follows:

1. Click Create a Pin option in Pin login section.
2. You will be prompted to enter your Windows user account password. Click OK to continue.
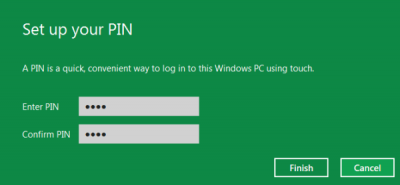
3. Enter PIN number of your choice and click Finish button to complete the setup.pin password 01 400x185 How To Set Up A Picture Password Or PIN In Windows 8
If you don’t want to use any of these methods, you can always stick to the traditional method of logging in to your Windows, at any time you want.

How to switch back to Local Account log on, from Live ID log on, in Windows 8

As you know, there are various methods for logging on to a PC running Windows 8. If you had opted for logging on using Windows Live ID during the installation of Windows 8 or changed to Windows Live ID log on later, but have now decided that you want to switch back to logging on using Local account,  here is how its done.
Open Control panel by clicking on the Control Panel app on the Start screen, click on ‘More settings’ > User Accounts. Click on ‘Change to a local account’
logon1 600x294 How to switch back to Local Account log on, from Live ID log on, in Windows 8
You’ll see this screen. Enter the current password and click Nextlogon2 600x462 How to switch back to Local Account log on, from Live ID log on, in Windows 8
Enter the required information required to logon using a local account from now  on.
Click Nextlogon3 600x436 How to switch back to Local Account log on, from Live ID log on, in Windows 8
Now you are ready to change to local account. You will therefore be now logged off, so save any unsaved work if any and then click on Log off and finish.
After logging off, for the log on, you will now be provided with a local account log on.
You should know that using Windows Live ID (any email address) log on has some cool features as it syncs some settings across PCs you use. It also syncs settings like browser favorites, history, shortcuts, passwords for the various services you use.

30 things about Windows 8

1. A great feature introduced in Windows 8 is Genuine Center, through which you’ll be able to enter or change your license key and view the status of your license genuineness.
2. Windows 8 On screen keyboard, can split in two parts and converts in Thumb Keyboard to provide easy access to all keys on a Tablet.
3. Multitasking has been made easy and more efficient. Windows 8 runs two different UI simultaneously.
4. Apps can communicate with each other in Windows 8.
5. Gesture-based navigation is intuitive and fast.
6. The most unique feature of Windows 8 is that it offer Multi-Monitor options where on one monitor you can display your start screen and the desktop on the other.
7. In Windows 8, Task Manager is easy to use with all-in-one dashboard for monitoring and controlling of what’s going on.
8. Windows 8 removes the fear of PC failure as it has Push-Button Reset option.
9. Windows 8 automatically manages to keep the PC up to date without interrupting you in the middle of your work with the newly featured Windows Update.
10. In Windows 8 cryptography is much easier.
11. Windows 8 supports newly designed SmartScreen which is a set of sophisticated technologies to help protect you from malicious websites and programs.
12. Windows 8 comes integrated with built-in drivers that support a broad range of devices, including printers, sensors, touch-input devices, and displays.
13. Secured boot stops malware in its tracks and makes Windows 8 significantly more resistant to low-level attacks.
14. Windows 8 allows mobility and connectivity virtually from anywhere.
15. In Windows 8 DirectAccess helps remote users to securely access resources within a corporate network.
16. AppLocker has been enhanced with richer capabilities and enables to manage both desktop and Metro style applications.
17. Business users can save their data from unauthorized access as Windows 8 comes preloaded with new version of BitLocker.
18. Windows 8 introduces Windows store from where you can find the apps you want, ranging from exciting new games, to the productivity tools and many more.
19. Windows 8 intends many new features for business users.
20. You can set Windows 8 to auto refresh which eliminates the need of pressing F5 again and again.
21. Windows 8 provides a reset option, which restores the PC to the state it was in when originally purchased in case a major PC failure happens.
22. You can integrate your Windows live ID account in Windows 8, hence eliminating need of creating a separate user account locally.
23. Windows 8 is going to feature built-in Cloud Apps and services with SkyDrive.
24. Protecting the pre-OS environment with UEFI.
25. Windows 8 is also likely expected to comprehend the Calling and SMS capabilities on 3G supported tablets.
26. Driver developers can use the new, integrated Microsoft Visual Studio development environment to increase productivity and develop richer applications.
27. Windows 8 supports a broad range of app programming languages (for example, C,C++,HTML5,CSS3,DirectX 11.1,XAML).
28. Windows 8 offers Windows Push Notification Service through which apps can receive secure messages from your website, and send them to your app’s live tile or pro vide a notification to the user.
29.Windows 8 integrates support for contact selection directly within Windows using its feature Contact Picker.
30. Windows 8 supports Mobility and Connectivity on the Go for business users.

How to prevent users from installing programs in Windows 7

You can if you wish restrict users from installing programs in Windows 7 , Windows Vista, Windows XP , Windows 2000 & Windows Server family. You can do so by using certain Group Policy settings to control the behavior of the Windows Installer, prevent certain programs from running or restrict via the Registry Editor.
The Windows Installer, msiexec.exe, previously known as Microsoft Installer, is an engine for the installation, maintenance, and removal of software on modern Microsoft Windows systems.
1) Disable or restrict the use of Windows Installer via Group Policy.
disable windows installer How to prevent users from installing programs in Windows 7
Type gpedit.msc in start search and hit Enter to open the Group Policy Editor. Navigate to Computer Configurations > Administrative templates > Windows Components > Windows Installer. In RHS pane double-click on Disable windows installer. Configure the option as required.

Saturday 26 November 2011

Windows Server 2008 as a LAN Router Running RIP

If you’re designing a virtual test or evaluation network and want to get into complicated network scenarios you will eventually need to segment out your virtual network.
To do that you need something functioning as a router, since this may be virtual machines, you can’t just plug-in a hardware solution. This will allow you to mimic a much larger network and teach you how things might be done in a mid to enterprise sized environment.
For this walkthrough I will show you how to turn a Server 2008 box with two network interfaces into a router.

How to Install Routing on Windows Server 2008

I am going to be running this demo on a cleanly installed Windows Server 2008 virtual machine that is configured with two network interfaces both set to "Local Only" in Virtual PC 2007.
It currently holds no role information and will only function as a router. We will also configure RIP routing protocol so it can talk to other routers on the network.
1. Start Server Manager.
2. Click on Roles, and then click on Add Roles.
Windows Server 2008 as a LAN Router Running RIP - 1
3. Since this is a clean install we get a Before You Begin warning page telling us that if we’re going to install a role on a server to make sure it is secure. If you get this page, just click Next.
4. On the Select Server Roles page go ahead and place a check next to Network Policy and Access Services. Click Next after you’re done.
Windows Server 2008 as a LAN Router Running RIP - 2
5. The next page gives you an overview of the Network Policy and Access Services and everything that you can do with it. Read through the various options and click Next.
Windows Server 2008 as a LAN Router Running RIP - 3
6. The Select Role Services page now comes up and we are going to go ahead and place a check next to Routing & Remote Access Services.
Note that you cannot just click on Routing because it is dependent on the Remote Access Service also being installed; then click Next.
Windows Server 2008 as a LAN Router Running RIP - 4
7. You are now asked to confirm your installation selections, review everything and then click on Install.
Windows Server 2008 as a LAN Router Running RIP - 5
8. After a few minutes you should see an Installation Results page and the outcome hopefully is Installation Succeeded, review any messages and then click Close.
Windows Server 2008 as a LAN Router Running RIP - 6
9. Now in Server Manager you can see in roles that Network Policy and Access Services is now installed, but it is in a down state because no devices are associated to the service.
Windows Server 2008 as a LAN Router Running RIP - 7
Windows Server 2008 as a LAN Router Running RIP - 8
Go ahead and close out Server Manager as that now concludes the install of the Router service on the Windows Server 2008.

How to Configure Routing on Windows Server 2008

Ok let’s go ahead and get routing enabled and configured by associating some of our network adapters with the service.
1. Click on Start, Administrative Tools, Routing and Remote Access
Windows Server 2008 as a LAN Router Running RIP - 9
2. When the Routing and Remote Access MMC starts you will notice that the server has a red down arrow showing that it is currently offline.
Right click on the server and select configure and Enable Routing and Remote access.
Windows Server 2008 as a LAN Router Running RIP - 10
3. The Routing and Remote Access Server Setup Wizard will now come up, go ahead and click Next to get started.
Windows Server 2008 as a LAN Router Running RIP - 11
4. There are quite a few default options for this service that include:
  • Remote Access
  • Network Address Translation (NAT)
  • Virtual Private Network (VPN) & NAT
  • Secure Connection Between Two Private Networks
  • Custom Configuration
We are going to choose Custom Configuration and click Next.
Windows Server 2008 as a LAN Router Running RIP - 12
5. In the Custom Configuration screen you can choose several services, but for this demo go ahead and place a check next to LAN routing and then click Next.
Windows Server 2008 as a LAN Router Running RIP - 13
6. Again you will see a summary of your selections and you can go ahead and click on Finish.
Windows Server 2008 as a LAN Router Running RIP - 14
7. Next a pop-up window will tell you that Routing & Remote Access service is now ready to use, and you can click on Start service to start it.
Windows Server 2008 as a LAN Router Running RIP - 15
8. After a few seconds the service will start and the wizard will close. You can see in the Routing and Remote Access MMC that the server now has a green up arrow which shows that it is in a enabled state and functioning.
If you expand out the IPv4 folder and left click on General you will see the network interfaces listed in the right pane. Now right click on General and select New Routing Protocol.
Windows Server 2008 as a LAN Router Running RIP - 16
9. The New Routing Protocol window will contain 4 available protocols:
DHCP Relay Agent
IGMP Router and Proxy
NAT
RIP Version 2 for Internet Protocol

For this demo we are going to choose RIP Version 2 for Internet Protocol, though if you wanted the router to pass DHCP information you would also want to enable DHCP Relay Agent, but for this demo it is not necessary.
Make your selections and click OK.
Windows Server 2008 as a LAN Router Running RIP - 17
10. You should now see the RIP protocol under the IPv4 folder in your Routing and Remote Access MMC.
If you select it, you will find no information on it, because we need to enable the network interfaces we want this to work on. Go ahead and right click on RIP, then select New Interface.
Windows Server 2008 as a LAN Router Running RIP - 18
11. You can now add either interface, but not both as you can only approve one interface at a time. For this demo we are going to be working on Local Area Connection, select it and then click Ok.
Windows Server 2008 as a LAN Router Running RIP - 19
12. The RIP properties window now comes up to be configured.
There are many different options you can configure in this window, but unless you are using other types of routers in your network with RIP you can just leave the defaults in place. Go ahead and click Ok.
Windows Server 2008 as a LAN Router Running RIP - 20
13. Go ahead and repeat steps 11 and 12 for Local Area Connection 2, and then you should see both interfaces under RIP in the Routing and Remote Interface MMC.
Windows Server 2008 as a LAN Router Running RIP - 21
You have now configured the Windows Server 2008 virtual machine to function as a router between its two network cards. As I mentioned this can help you setup a segmented network that will allow you to emulate a corporate environment for testing and learning.
While this article focused on setting it up for a virtual environment, it would also work the same way if you configured this on a physical server.

Monday 21 November 2011

Make Portable Version Of any Software Using Cameyo

Now a days almost everybody  carries a pendrive whether he is a IT professional or a home User.There are a lot of softwares that you want to carry with you so that you can open them anywhere without any installations.Here isthe solution to create a portable version of any software.Moreover you can also create a package of software.
Consider you love using opera browser and addicted to its user interface.You can create the portable version of opera with java and flash already installed in the opera.So you are not creating a portable version of your favourite browser instead you are creating a portable executable package file that has opera with flash and java already installed in it.
Your Opera Package= Opera Browser+Java+Flash+Addons
You can create a portable package of your choice of softwares.
Here is the complete step by step video tutorial  to  Make Portable Version Of any Software Using Cameyo
1. Download the Cameyo software.Its completely free.
2.Install the software.
3.Now Click on Start->Cameyo->Caputre Software Installation
4.Intstall the software into your system whose portable version you want to create.
5.After Complete installation of the software click on the Install Done of the cameyo screen.
6.Now it will create a portable version of your installed software which you can carry and run anywhere without any installation.

How to Fix MBR in Window XP, Vista and 7

When the computer system is turned ON the first program that it loads is BIOS (Basic Input Output System).The BIOS also need a memory address from where it can load its Boot Program known as MBR(Master Boot Record) or  Master Boot Sector or Boot Sector which starts the further processing .The exact location of this boot record is cylinder 0, head 0 and sector 1 which is the first available space on harddisk. MBR contains all the necessary information for loading the operating system.

Some Error Messages and their Causes:

If your system’s  MBR gets corrupted your operating system will not load and this is commonly referred as Window Crash.MBR can become corrupted due to viruses in your operating system or sudden Power OFF.Following are the error messages you will get due to corrupt MBR
  • Error in loading operating system
  • Missing operating system
  • Invalid partition table
You can also get these error messages when you Multiboot your system i.e. installs two operating systems (like Window 7 & LINUX)  and uninstall any of them. Now when you try to load the other OS it goes the memory location where the boot loader of uninstalled operating system was present and try to load it. As there is no boot loader of that operating system then it will produce one of the above mentioned error messages.
When a user get these error messages then the first thought comes in his mind is that his windows has been corrupted and he has to reinstall a fresh copy of the operating system.
The thing is that the boot program of the installed OS is present at different memory location on the disk  and you have to map the boot loader with the operating system ,not to reinstall the fully OS again.

How to Fix MBR in Windows Operating System

Fix MBR for windows XP:

  • First of all, restart your computer and insert Windows XP setup disk in the CD drive.
  • Once the setup loads, you will see the following options just press R to repair your Windows.
111 How to Fix MBR in Window XP, Vista and 7
  • Once the Recovery Console loads up, press 1 which will corresponds to your Windows installation and hit Enter. Now type your Administrator password.
3 How to Fix MBR in Window XP, Vista and 7
  • Now in the command prompt window type fixmbr and press Enter. Your MBR will now be replaced with a new MBR. You can also run the fixboot command to repair the boot sector.
Note:- Make sure you only use these commands on a system where only one operating system has installed. If you run these commands where more than one operating system has installed then fixmbr and fixboot could mess up everything.

Fix MBR for windows Vista & 7:

  • First, insert Windows Vista or window 7 CD in the disk drive and press any key to boot from the disc.
  • Now Choose the language, time, currency etc and click Next. Now click on Repair Your Computer.
4 How to Fix MBR in Window XP, Vista and 7
  • Select the operating system to repair option and then click Next. Now in the System Recovery Options window choose the Command Prompt.
5 How to Fix MBR in Window XP, Vista and 7
  • For Window VISTA in the command prompt window type bootrec.exe and press Enter.
  • For Window 7 in the command prompt window type bootsect /nt60 C:\ and press Enter where C: is the disk drive where your operating system has installed. You can change this drive letter according to your installed operating system’s location.
  • Once done, eject the disc and restart your computer for the change to take effect.
That’s it now your operating system will boot normally without any problem.

Saturday 19 November 2011

How to FIX Task Manager in Window XP


Windows Task Manager is a inbuilt program where you can check what processes are currently running on your computer system, you can also set priority of these processes. This is very helpful when you have to start or end any task or process forcefully. Task Manager can also be used to monitor RAM usage by CPU and its performance .Viruses and trojans can disable your Task Manager and you will get an error message :-
1 How to FIX Task Manager in Window XP

Different Methods to FIX Task Manager

Method 1: By Enabling it Manually

  • Open Run command [Win+R].
  • Type gpedit.msc in it and click OK.
12 How to FIX Task Manager in Window XP
  • Now Group Policy Editor will be open and in it expand it as
User Configuration>Administrative Templates>System>Ctrl+Alt+Del Options
  • In the Right window panel look for the Remove Task Manager and Double Click on it.
13 How to FIX Task Manager in Window XP
  • Select Not Configured option and click on OK button.
14 How to FIX Task Manager in Window XP

Method 2: By Changing the Registry Settings

  • Open Run command [Win+R].
  • Type regedit and click OK.
15 How to FIX Task Manager in Window XP
  • Now expand Registry Keys as
HKEY_CURRENT_USER\Software\Microsoft\Windows\CurrentVersion\Policies\System
  • In the Right window pane look for the DisableTaskMgr. Right click on it and click on Delete.
18 How to FIX Task Manager in Window XP

  • Confirm the Delete message and your Task Manager will available once again.

Friday 18 November 2011

How to Download Torrent Files with IDM:

Downloading files from the Torrents site is easy and completely legal (unless you are downloading copyrighted files).Downloading speed from torrents depends upon various factors like seeders, leechers, internet connection etc.If have high speed internet connection but still not getting good downloading speeds then you can use IDM to download them.There are various methods on the internet to do this but this is the easiest, simplest and tested method.

How to Download Torrent Files with IDM:

  • Open  www.torrentz.eu .Search and Download the torrent file (.torrent) of your desired file from there.
112 How to Download Torrent Files with IDM
  • Once you have downloaded that torrent file then go to the website www.torcache.net
  • Now upload that torrent file that you have just downloaded and click on the cache button.
122 How to Download Torrent Files with IDM
  • This will generate a new torrent link of your file just copy that link.
131 How to Download Torrent Files with IDM
  • Now go to the www.torrific.com and get register there if you don’t have account  otherwise login into your account.
  • In the text field paste that new torrent file that you have get in the 4th step and click on get button.
141 How to Download Torrent Files with IDM
  • You will see all the torrent files that are present in that torrent . Click on initiate bittorrent transmission button.
151 How to Download Torrent Files with IDM
  • Now all the files that are present in that torrent file will be available to download just click on any of the file that you want to download and IDM window will popup.
16 How to Download Torrent Files with IDM
  • Now Start Downloading your file.
You should use this method only if you are getting very poor speed with your torrent client because if you download it with IDM the link will not be resumable and you have to finish it without breaking your internet connection.

Step-By-Step Guide to Reset Windows 7 Password


How to Reset Windows 7 or Vista Password If somehow you have forgotten your windows password and are looking for way around to login back into your computer then you won’t have to worry.There are many methods are available for resetting password of your windows 7 or vista.But many of them are lengthy or sophisticated.This is one of the simplest method and you only need a windows installation CD/USB to reset the password.It relies on an unpatched bug in windows operating system.

Step-By-Step Guide to Reset Windows Password:

  • Insert windows 7 disk into your CD Rom and Restart your computer.
  • Press any key to Boot from the CD and then click on Repair your Computer.
11 How to Reset Windows 7 or Vista Password
  • Now from the various options select Command Prompt.
121 How to Reset Windows 7 or Vista Password
  • Now Command Prompt will be open and create a backup of Sticky keys by typing the following command in the command prompt
copy c:\windows\system32\sethc.exe c:\
  • Now replace sticky keys with the Command Prompt by typing the following command
copy c:\windows\system32\cmd.exe c:\windows\system32\sethc.exe
3 How to Reset Windows 7 or Vista Password
  • Now Restart your computer.
  • When you get the windows login screen then hit Shift button for 5 times continuously and Administrative Mode of Command Prompt will be open.
42 How to Reset Windows 7 or Vista Password
  • Now to reset the password just type the following command
net user geek MyNewPassword
5 How to Reset Windows 7 or Vista Password

Remember: geek is the username of the computer and MyNewPassword is the password. Replace both as you wish.
  • Login in your computer system with your new Username and Password.
Now every time when you press Shift key for 5 times then command prompt will be open instead of Sticky keys. To get back these Sticky keys repeat first three steps and then in the command prompt window type the following command.